Intro
Our goal for this mini-hackathon was to build a browser based version of the iOS Face ID interaction - capturing the essence of the original and showcasing some innovative web technologies.
State Management
To begin with we created a Zustand store as our global state management system. It helps us easily share state between components whilst minimising unnecessary re-renders caused by React State/Context.
import { create } from 'zustand'

export enum VerificationStatus {
  Idle = 'idle',
  Initialising = 'initialising',
  Analysing = 'analysing',
  Success = 'success',
}

type Store = {
  status: VerificationStatus
  isCameraReady: boolean
  isUnlocked: boolean
  setStatus: (status: VerificationStatus) => void
  setIsCameraReady: (isCameraReady: boolean) => void
  lock: () => void
  unlock: () => void
}

export const useFaceIDStore = create<Store>((set, get) => ({
  // State setting logic here...
}))
We have a status property for each of the system stages, we track whether the camera is ready, and if the content is unlocked. The combination of these three values is enough to drive the entire system.
The Expanding Island
by Theo Walton
SVG Preparation
We imported our reference screenshots into Figma, where we set about matching the size and shape of each of the island's animated steps.
To get a fluid, more realistic motion (closer to Apple vibe), we built shaped three vectors instead of just the start and end:
- Start — the default wider pill shape.
- Middle — a slightly narrower/thicker pill shape that helps the animation pass through a natural “squash” phase.
- End — the tall rounded square shape used when expanded.
As the end shape's corners weren't matching to any standard radii, they were rebuilt using the Pen tool and then mirrored vertically to retain absolute symmetry.
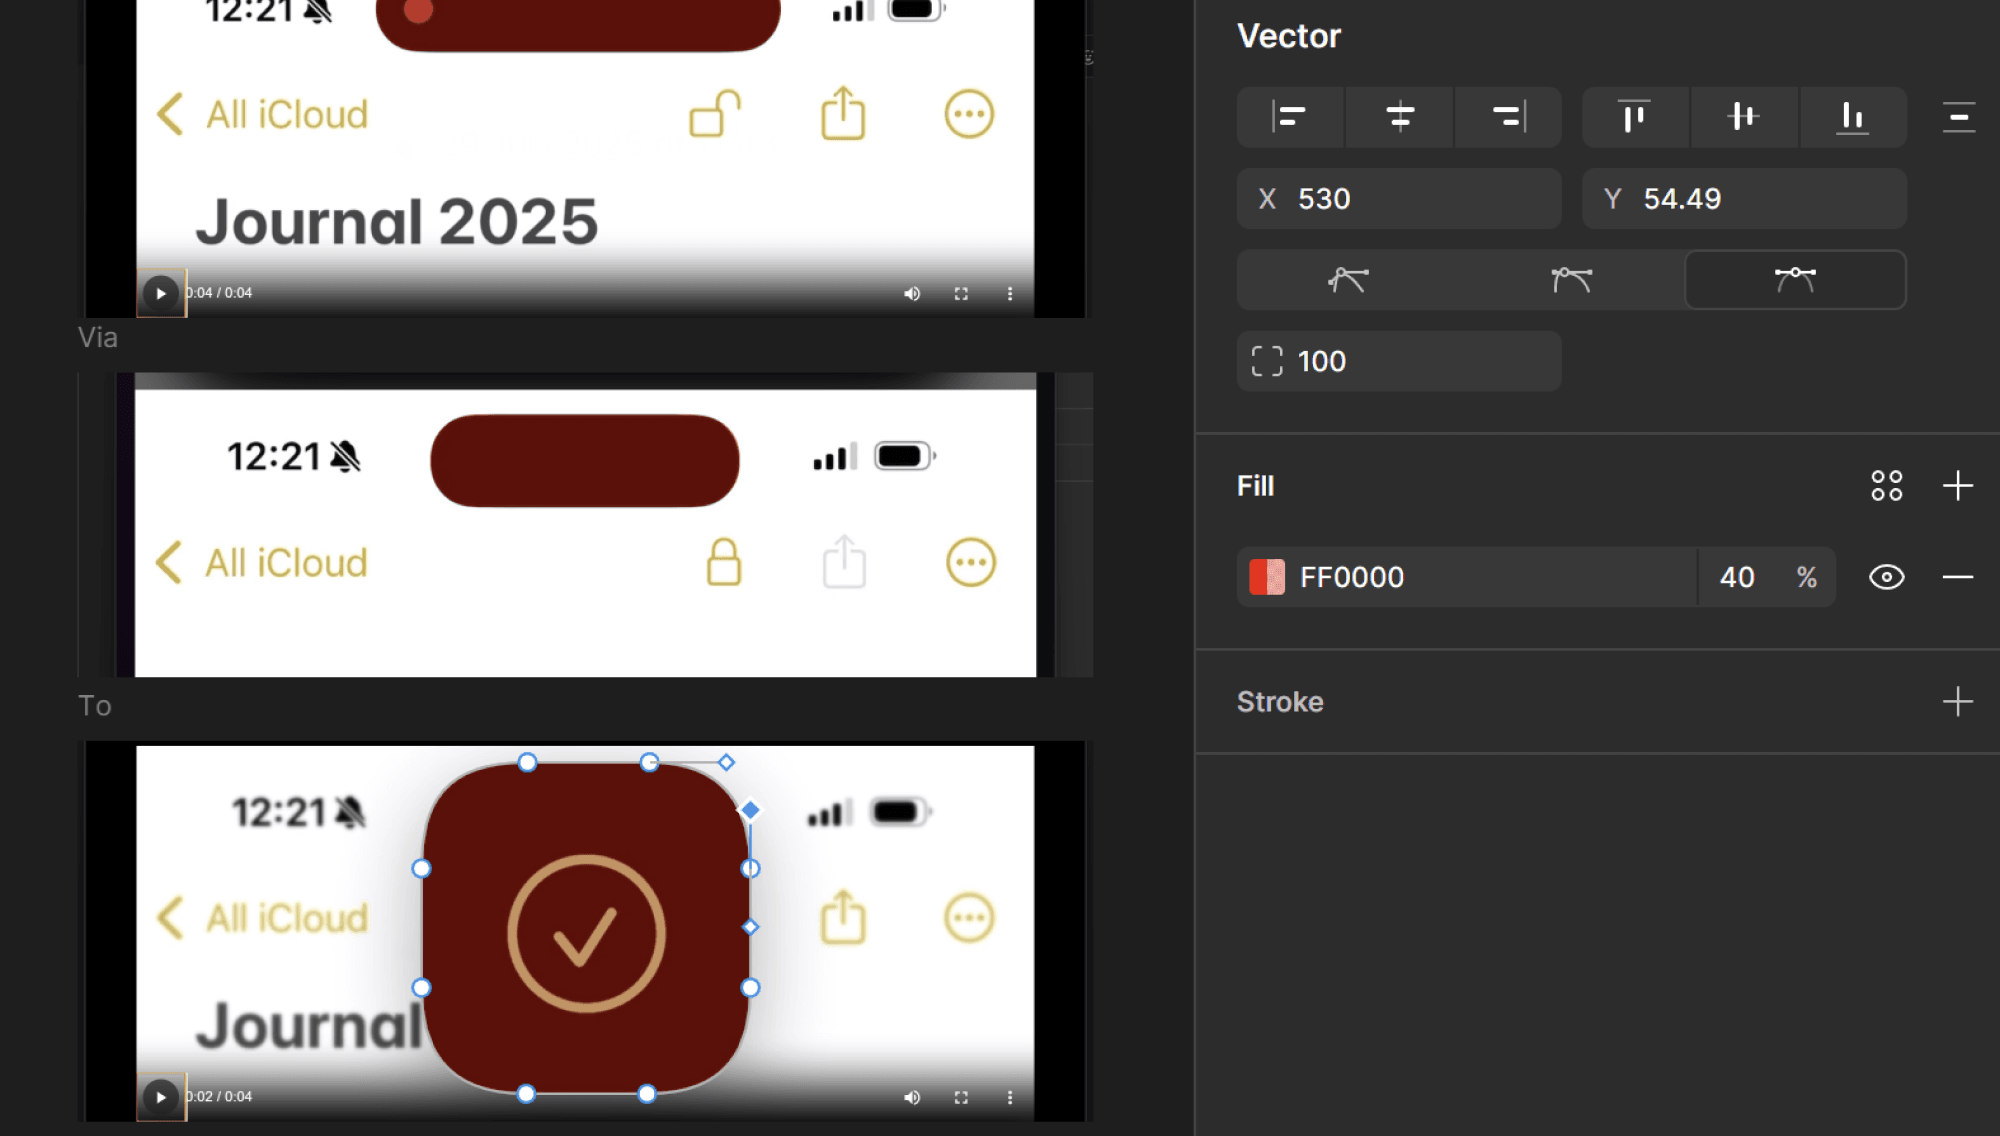
Once the three vectors aligned correctly to the screenshots, they were exported as SVG, with the d path data then extracted into the .tsx file. Each d string being stored as a constant for easy reuse.
const pathStart = 'M320 34C320 14 304 0 286 0H34C15 0 0 14 0 34C0 54 16 69 34 69H286C304 69 320 54 320 34Z'
const pathMiddle = 'M290 34C290 14 274 0 256 0H64C45 0 30 14 30 34C30 54 46 69 64 69H256C274 69 290 54 290 34Z'
const pathEnd =
  'M289 84C289 38 273 0 207 0H113C47 0 31 38 31 84V178C31 224 47 261 113 261H207C273 261 289 224 289 178V84Z'
Animated Clip Path
The animation uses an SVG clipPath that's shaped by the morphing path.
The container being clipped (masked element) is slightly taller than the SVG height because the expansion uses a back.out easing that overshoots the boundary before settling. Without this extra height, that overshoot would be visibly clipped, ruining the effect of elasticity of the shape.
<div
  ref={container}
  className="pointer-events-none relative z-100 flex h-[72px] w-[320px] flex-col items-center justify-center">
  <svg
    width={320}
    height={261}
    viewBox="0 0 320 261"
    fill="none"
    className="relative"
    xmlns="http://www.w3.org/2000/svg">
    <defs>
      <clipPath id="island-clip" clipPathUnits="userSpaceOnUse">
        <path ref={path} d={pathStart} />
      </clipPath>
    </defs>
  </svg>
  {/* The masked element is taller because the back easing causes the clip path to expand beyond 261px height */}
  <div
    className="absolute top-0 flex h-[281px] w-[320px] items-center justify-center bg-[#000] pb-[10px]"
    style={{ clipPath: 'url(#island-clip)' }}>
    <FaceIDCanvas className="!absolute top-0 !h-[261px] !w-[320px] bg-[#000]" />
    <FaceIDCheckMark className="absolute z-20 size-[64px]" />
  </div>
</div>
The animation timeline is driven by the state of isExpanded (true when the status is "Analysing" or "Success"), with Mantine's useDidUpdate used instead of useEffect so the animation doesn't run on the initial mount.
In the GSAP config, morphSVG.shape defines the next target path, morphSVG.type = 'linear' keeps point mapping straightforward because the shapes are already clean and aligned, giving a smooth transition.
morphSVG.origin aligns the shapes, with first shift using '50% 0%', giving a top-down feel, then '50% 20%' so the expansion appears anchored slightly above center, in order to improve the curve of the top radii during the transform.
We set transformOrigin explicitly to avoid surprises with percentage anchors, and ease: 'back.out(1.4)' provides the bouncy, elastic effect when completing.
const isExpanded = status === VerificationStatus.Analysing || status === VerificationStatus.Success
const timeline = useRef<GSAPTimeline | null>(null)

useDidUpdate(() => {
  if (isExpanded) {
    // Expand the Island
    timeline.current = gsap
      .timeline()
      .to(path.current, {
        duration: 0.1,
        morphSVG: { shape: pathMiddle, type: 'linear', origin: '50% 0%' },
        transformOrigin: '50% 0%',
        ease: 'power2.out',
      })
      .to(
        path.current,
        {
          duration: 0.6,
          morphSVG: { shape: pathEnd, type: 'linear', origin: '50% 20%' },
          transformOrigin: '50% 50%',
          ease: 'back.out(1.4)',
        },
        0.09,
      )
  }

  if (!isExpanded) {
    // Collapse the Island
    timeline.current = gsap
      .timeline()
      .to(path.current, {
        duration: 0.35,
        morphSVG: { shape: pathMiddle, type: 'linear', origin: '50% 20%' },
        transformOrigin: '50% 20%',
        ease: 'back.in(1.4)',
      })
      .to(path.current, {
        duration: 0.16,
        morphSVG: { shape: pathStart, type: 'linear', origin: '50% 20%' },
        transformOrigin: '50% 20%',
        ease: 'back.out(1.6)',
      })
  }

  return () => {
    timeline.current?.kill()
  }
}, [isExpanded])
The timeline is stored in a ref and killed in useDidUpdate cleanup to prevent stale tweens after state changes or unmounts.
From a performance and UX perspective, only a single path is animated, with the clipped content (canvas + checkmark) remaining static relative to its container, avoiding any layout shift of the inner content.
Camera and Expression Recognition
by Tom Isherwood
The heart of our Face ID system relies on machine learning to detect facial expressions through the user's camera.
Our implementation leverages TensorFlow.js to run pre-trained neural networks directly in the browser, enabling facial recognition without sending any data to external servers. This is not a biometric check, we're just looking for a smile!
Camera Initialization
The first step involves requesting camera access and setting up a video stream:
const initCamera = async () => {
  const stream = await navigator.mediaDevices.getUserMedia({
    video: { facingMode: 'user', width: 640, height: 480 },
  })
  videoRef.current.srcObject = stream
  await videoRef.current.play()
}
We use the front-facing camera with standardized dimensions to ensure a consistent input.
TensorFlow.js Model Architecture
Our system utilises three complementary neural networks running in parallel:
1. Face Detection Network
- Purpose: Localises faces within the video frame
- Architecture: Lightweight, optimised for real-time detection
- Output: Bounding box coordinates and confidence scores
2. Facial Landmark Detection
- Purpose: Identifies precise facial feature points e.g eyes, mouth etc.
- Use Case: Provides foundation for the expression analysis
3. Expression Classification Network
- Purpose: Analyzes facial geometry to classify emotions
- Architecture: Deep neural network trained on thousands of facial expressions
- Output: Probability scores for 7 emotions (happy, sad, angry, fearful, disgusted, surprised, neutral)
Face-api.js Integration
To utilise these models efficiently, we use the face-api.js wrapper library, which provides a convenient JavaScript interface for TensorFlow.js-based face recognition models.
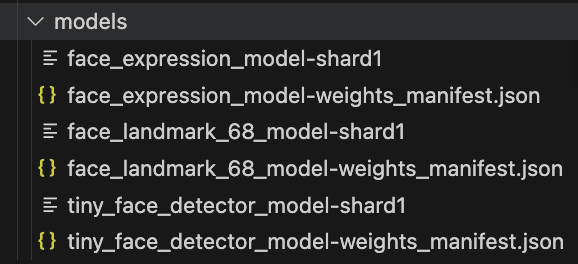
The library requires us to load the model files before we can perform any face detection. These model files are stored in our /public/models directory and loaded asynchronously:
const loadModels = async () => {
  const MODEL_URL = '/models'
  await Promise.all([
    faceapi.nets.tinyFaceDetector.loadFromUri(MODEL_URL),
    faceapi.nets.faceLandmark68Net.loadFromUri(MODEL_URL),
    faceapi.nets.faceExpressionNet.loadFromUri(MODEL_URL),
  ])
}
Each model file corresponds to one of the neural networks described above. The models work in sequence: first detecting faces, then identifying landmarks, and finally classifying expressions based on those landmarks.
Real-time Expression Analysis
Once the models are loaded, we can perform real-time face detection and expression analysis on the video stream:
const detectFace = async () => {
  const detections = await faceapi
    .detectSingleFace(videoRef.current, new faceapi.TinyFaceDetectorOptions())
    .withFaceLandmarks()
    .withFaceExpressions()

  const happy = detections?.expressions?.happy

  if (!!happy && happy > HAPPY_THRESHOLD) setStatus(VerificationStatus.Success)
}
We check for a smile every 500ms, balancing performance with responsiveness. When the "happy" emotion confidence exceeds our threshold (70%), we can be confident the user is smiling and therefore trigger a successful verification.
TensorFlow.js Advantages
Browser-based ML: All computation happens locally using WebGL acceleration, ensuring privacy and low latency.
Pre-trained Models: We leverage models trained on large datasets, eliminating the need for custom training infrastructure.
WebGL Acceleration: TensorFlow.js automatically utilises GPU resources for speed, crucial for real-time applications.
Rings Animation - Three.js Ray Marching
by Matthew Frawley
The verification animation is powered by a sophisticated volumetric ray marching shader built with Three.js TSL (Three Shading Language) and WebGPU.
Target Result
The main challenge was to have the rings appear softer and less dense, before solidifying as the verification is successful.
I considered using torus meshes, but the shader-only approach allows for more control over their appearance, and the ability to blend them smoothly as they intersect.
By adding controls to the UI, I was able to tweak the shader variables in real-time - helping achieve the desired effect.
Here's what's happening under the hood:
Core Technique: Volumetric Ray Marching
- Uses a ray marching algorithm with signed distance functions to render volumetric shapes
- Renders two intersecting torus rings that are individually controlled and blended
- Implements physically-based light scattering and absorption using Beer's law for realistic volume rendering
Note: With this technique there are no 3D meshes, the shapes are procedurally generated in the shader!
Transitions
Status: Idle
Rings are completely transparent and stationary.
Status: Analysing
Rings fade in with rotating animations, pulsing visibility, and organic blending between the two torus shapes.
Status: Success
Rings solidify and sharpen, align to face forward, with one ring fading out to create the final "unlocked" state.
Using GSAP to animate shader uniforms
The animation is orchestrated using GSAP tweens that update whenever the status value changes.
Each tween targets a shader uniform:
const uRingARotation = uniform(vec3(0, 0, 0)).label('uRingARotation')gsap.to(uRingARotation.value, {
x: 0,
y: degToRad(-360),
z: degToRad(360),
duration: 1.3,
repeat: -1,
ease: 'none',
delay,
}),This technique gives us a way to animate the shader variables (uniforms) on the CPU using GSAP's rich feature set (delays, easings, yoyo, repeat, etc.). Whilst still handing off the heavy lifting of rendering to the GPU.
Advanced Shader Features
- Smooth minimum blending for seamless ring merging
- Controllable parameters (density, scattering, softness, visibility) for fine-tuned visual control
- Post-processing bloom effect that intensifies during the analysing phase giving it a subtle glow
You can find all of the code here.
The Checkmark - Animated SVG stroke
We drew a path (line) over our reference screenshot and exported it from Figma as an SVG file.
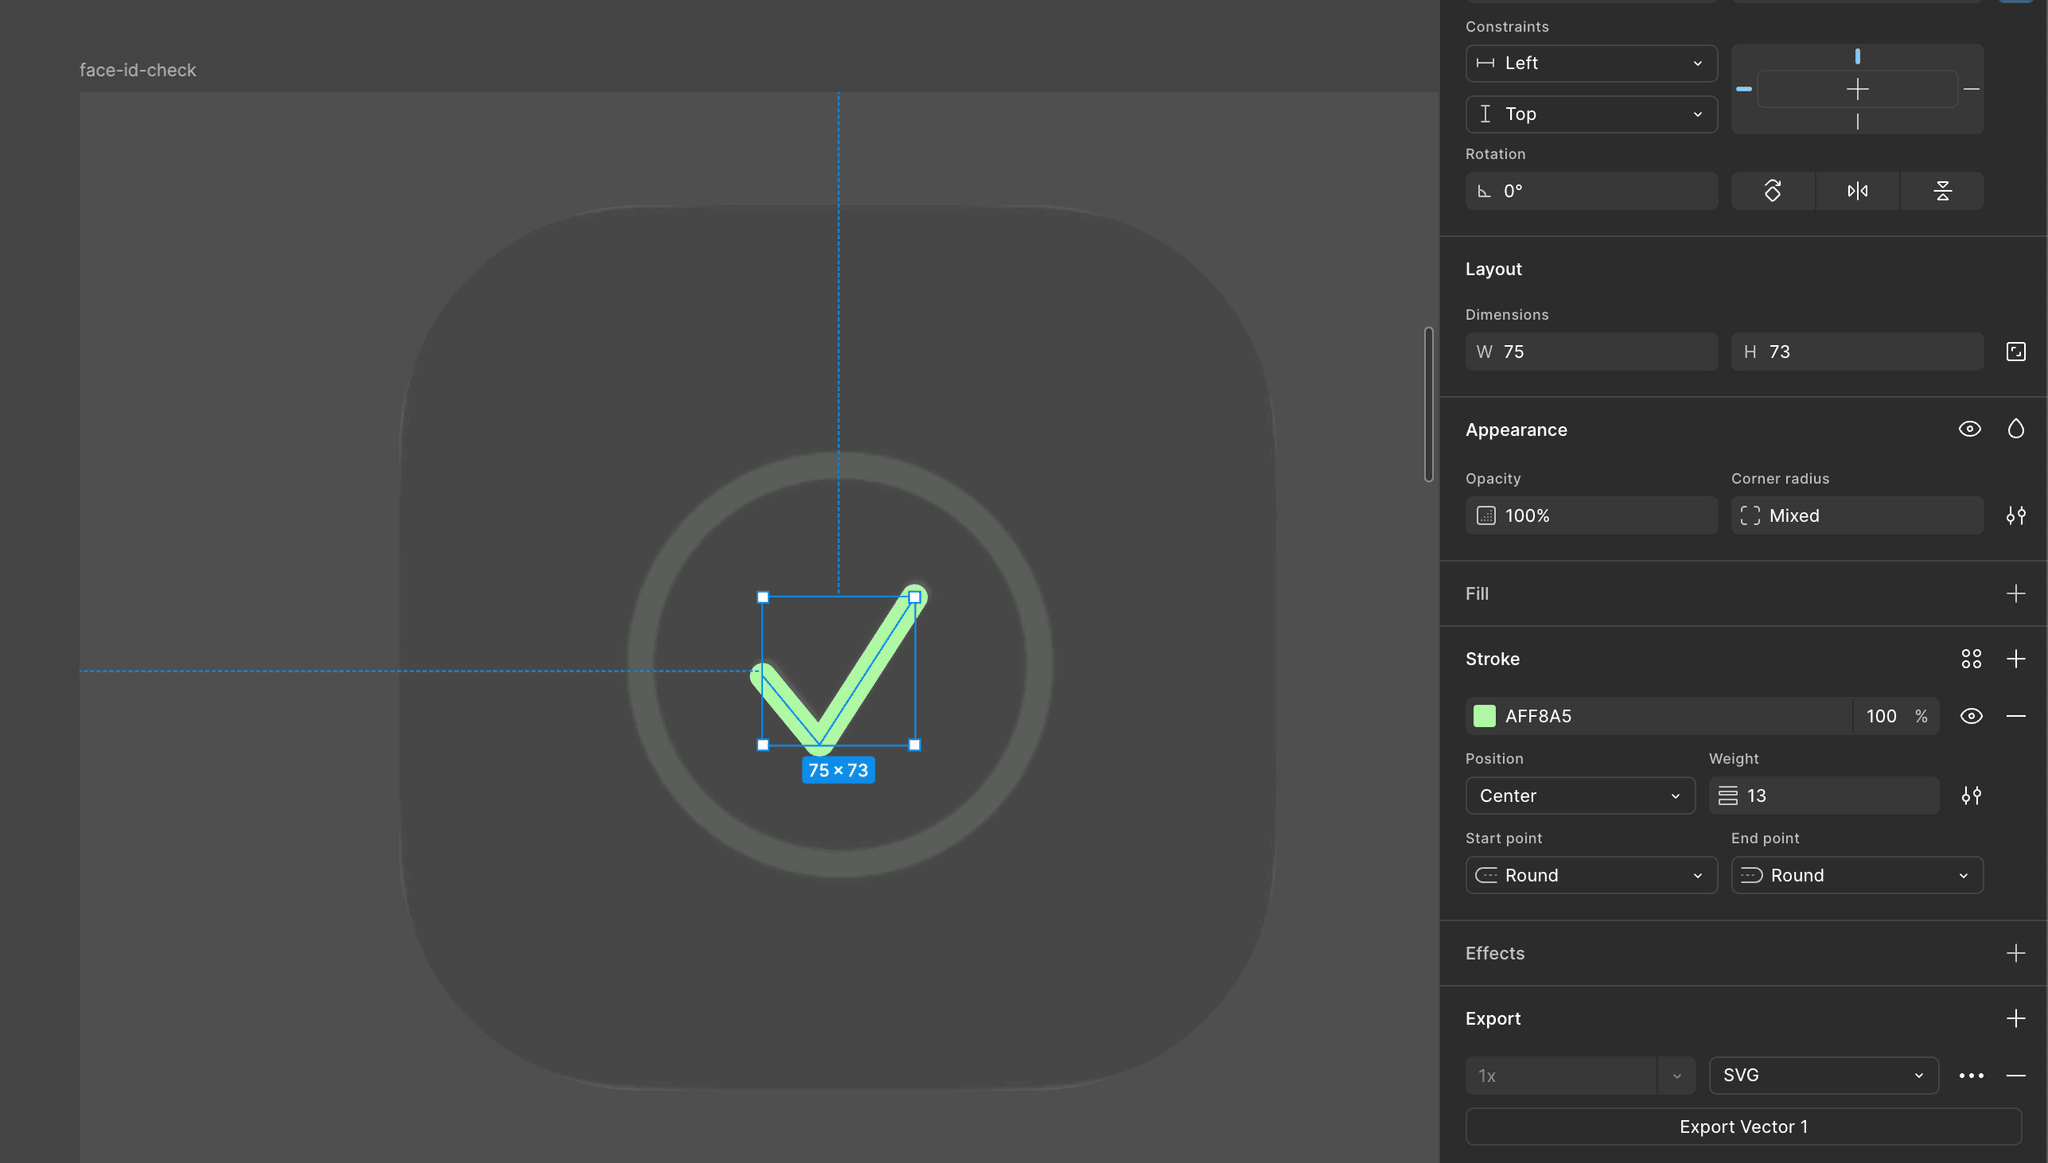
<svg
  ref={svg}
  width="89"
  height="86"
  viewBox="0 0 89 86"
  fill="none"
  xmlns="http://www.w3.org/2000/svg"
  className={className}>
  <path
    id="check-path"
    d="M7 46L34.129 78.9423C34.5597 79.4654 35.3749 79.4177 35.7417 78.848L82 7"
    stroke="#AFF8A5"
    strokeWidth="13"
    strokeLinecap="round"
  />
</svg>
With the SVG code added to our React component, we then used the GSAP DrawSVG plugin to animate it's stroke from 0 to 100%. This creates the effect of it being drawn on the screen.
const onEnter = contextSafe(() => {
  gsap.fromTo('#check-path', { drawSVG: '0' }, { drawSVG: '0 100%', delay: 0.25, duration: 0.42, ease: 'power1.inOut' })
})